Set up Your own GPU-based Jupyter easily using Docker
In some small steps, you will be guided to set up Your own instance of a GPU-leveraged Juypyterlab, that provides you with all machine learning libraries you are familiar with. This will enable you to use the flexibility of Jupyterlab and run your code in Tensorflow and PyTorch with an accelerated performance on your NVIDIA GPU.

The corresponding code repository is iot-salzburg/GPU-Jupyter and the images are provided on Dockerhub. More about this later :)
Requirements:
1. A computer including an NVIDIA GPU (a desktop PC or server)
The installation consists of the following steps:
1. Setup of Ubuntu (20.04 LTS or 18.04 LTS)
2. Installation of CUDA and NVIDIA drivers
3. (Optional) Validation of the CUDA Installation on the host system
4. Install Docker, Docker-compose and NVIDIA Docker
5. Deployment of GPU-Jupyter via Docker
7. (Optional) Deployment in a Docker Swarm
8. Configuration
Setup of Ubuntu
This guide was tested for Ubuntu 18.04 LTS, 19.10 and 20.04 LTS. Canonical announced that from version 19 on, they come with better support for Kubernetes and AI/ML developer experience, compared to 18.04 LTS, so we suggest 20.04. Both the Desktop image and Server Install image can be used, here we go with a minimal installation of the Desktop image which includes a browser and necessary packages but no office packages. If you don’t have your own setup with an NVIDIA GPU, check out Saturn Cloud for a free GPU-powered Jupyter solution.
Set a static IP via netplan
Jupyterlab has to be accessed remotely via its IP address from other nodes. The preferred way to do so is to adapt the netplan configuration. Therefore, upgrade and install basic packages and dependencies.
sudo apt update && sudo apt upgrade -y && sudo apt dist-upgrade -y && sudo apt install -f && sudo apt autoremove -y
sudo apt-get install build-essential gcc g++ make binutils net-tools
sudo reboot
Now configure etc/netplan/01-network-manager-all.yaml analog to this example, where the network device is called eno1, the IP address 192.168.48.48 is used and the additional DNS servers are 192.168.48.2 and 192.168.48.3. Make also sure that your network administrator registers the computer with the specified IP.
sudo nano etc/netplan/01-network-manager-all.yaml  # configure the static ip similar as shown below:# Let NetworkManager manage all devices on this system
network:
  version: 2
  renderer: NetworkManager
  ethernets:
    eno1:
      addresses: [192.168.48.48/24]
    routes:
      - to: default
        via: 192.168.48.1
      nameservers:
        addresses: [192.168.48.2,192.168.48.3,8.8.8.8,4.4.4.4]# create the configuration and apply in debug mode
sudo netplan generate
sudo netplan apply --debug
Now it should be possible to ping your workstation.
Activate SSH
In order to access and maintain the server remotely, SSH has to be installed and enabled:
sudo ufw allow 22
sudo apt update
sudo apt install openssh-server
sudo systemctl status ssh
sudo systemctl enable ssh
It should now be possible to access the server node from other devices in the same network, e.g. via:
ssh username@192.168.48.48You also might want to share the public key such that you don’t need the password for ssh:
ssh-keygen  # don't override an existing key, select an empty password
sudo ssh-copy-id -i ~/.ssh/id_rsa.pub username@192.168.48.48
ssh username@192.168.48.48
Installation of CUDA and NVIDIA drivers
CUDA is a driver package to access the NVIDIA GPU within programming languages. In case there already exists a CUDA version, first uninstall it:
# check if nvidia is installed
apt list --installed | grep 'nvidia'
# if CUDA was installed with a *.run-file, uninstall it this way
sudo /usr/local/cuda-11.6/bin/cuda-uninstaller
sudo /usr/bin/nvidia-uninstall
Then select a version that is compatible with PyTorch and Tensorflow, you can check the versions for PyTorch and Tensorflow or by an online search. Here, we install CUDA 11.6.2. A list of the available CUDA-drivers is here. Click on “accept” and install all packages, so the NVIDIA-drivers with version 510.47.03 and CUDA with version 11.6.2.
Add Keyring to allow automatic updates in the system
wget https://developer.download.nvidia.com/compute/cuda/repos/ubuntu2004/x86_64/cuda-keyring_1.0-1_all.deb
sudo dpkg -i cuda-keyring_1.0-1_all.deb
sudo apt update
In case there are duplicates, create a backup-dir and rm duplicates in /etc/apt/sources.list.d/
ls /etc/apt/sources.list.d/
mkdir apt_sources_bac
cp -r /etc/apt/sources.list.d/ apt_sources_bac/
rm /etc/apt/sources.list.d/[duplicate-package].list*
Install CUDA
After that, a GPU driver is installed that allows a CUDA version supported by PyTorch and Tensorflow. Here, version 11.6.2 is installed
sudo apt update
apt policy cuda  # check available versions of cuda
sudo apt-get install cuda=11.6.2-1
apt policy nvidia-gds  # check available versions of nvidia-gds
sudo apt install nvidia-gds=11.6.2-1
Since the GPU packages support only certain, not necessarily the latest CUDA version depending on the version, it must be prevented that ‘apt upgrade’ updates CUDA. For this purpose, the version of the CUDA package is frozen using the following command:
sudo apt-mark hold cudaCUDA post-install actions
After a reboot, this command now displays the utilization of the NVIDIA GPU and the CUDA drivers. Even though this command shows CUDA 11.7, CUDA 11.6.2 was actually installed. Only the nvidia-cuda-toolkit is for version 11.7, but it is backward compatible:
nvidia-smi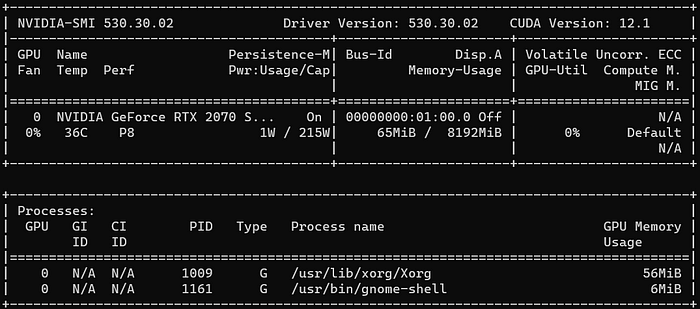
Tipp: To monitor the memory and usage of the GPU over time, use Ubuntu’s watch-command:
watch -n0 nvidia-smiIn case
nvidia-smihas problems finding the appropriate CUDA paths, you may have to manually set them. Set the following paths and append both lines in your local~/.bashrcor~/.zshrcfile, to set the path after each reboot. Note that `/usr/local/cuda/` is a symlink of `/usr/local/cuda-[version]/`.
export PATH=/usr/local/cuda/bin${PATH:+:${PATH}}
export LD_LIBRARY_PATH=/usr/local/cuda/lib64:${LD_LIBRARY_PATH:+:${LD_LIBRARY_PATH}}
Now, re-open your terminal before continuing to the next step or run:
source ~/.bashrc
You also might want to do this installation to use tools like nvcc:
sudo apt install nvidia-cuda-toolkit
nvcc --version
(Optional) Validation of the CUDA Installation on the host system
Note that we don’t install CudNN, because we are running the GPU-libaries within Docker. The Docker base-image that we will use, comes with CudNN. In case you want to run GPU-libraries in production on the host OS, we recommend to install CUDA Deep Neural Network (cuDNN).
This step requires the installation of Anaconda, which provides a well-maintained toolstack for statistical computing. The installation is described here, but if you are confident that everything works fine, you can skip this step. Otherwise, install Anaconda as described in the link and then create a virtual environment for the CUDA libraries:
conda create --name cuda_env
conda activate cuda_env
To deactivate the virtual environment, run: conda deactivate
Install PyTorch via these commands and specify the appropriate CUDA-Toolkit version: (see this for more info)
conda activate cuda_env
conda install numpy pyyaml mkl mkl-include setuptools cmake cffi typing
conda install pytorch torchvision cudatoolkit=10.1 -c pytorchpython
> # validate PyTorch:
> from __future__ import print_function
> import torch
> x = torch.rand(5, 3)
> print(x)
The output should be a PyTorch tensor of the form:
tensor([[0.3380, 0.3845, 0.3217],
        [0.8337, 0.9050, 0.2650],
        [0.2979, 0.7141, 0.9069],
        [0.1449, 0.1132, 0.1375],
        [0.4675, 0.3947, 0.1426]])
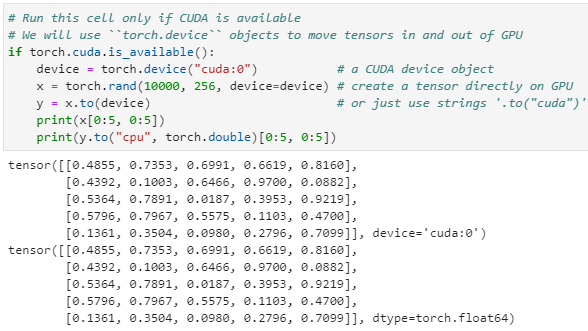
Now, check if CUDA can be accessed via PyTorch
conda activate cuda_envpython
> import torch
> torch.cuda.is_available()  # The output should be a boolean "True"
True
> device = torch.device("cuda")          # a CUDA device object
> x = torch.rand(10000, 10, device=device) # create tensor on GPU
A similar test can be done via Tensorflow:
conda activate cuda_env
pip install --upgrade tensorflow-gpupython
> from tensorflow.python.client import device_lib
> device_lib.list_local_devices()
The command should yield the built-in GPUs.
Install Docker, Docker-compose and NVIDIA Docker
Docker is an excellent tool to make an installation reproducible for others and to set up a complex environment such as ours with a single command. To install Docker and Docker-compose, please run the commands below or follow the linked compact guides from Digital Ocean. The preferred Ubuntu version can be chosen in the drop-down menu of the guides.
Install Docker
sudo apt update
sudo apt install apt-transport-https ca-certificates curl software-properties-common
curl -fsSL https://download.docker.com/linux/ubuntu/gpg | sudo apt-key add -
sudo add-apt-repository "deb [arch=amd64] https://download.docker.com/linux/ubuntu focal stable"
apt-cache policy docker-ce  # to check the installation candidate
sudo apt install docker-ce
sudo systemctl status docker  # check the systemctl status of the docker-service
docker  # help for docker
sudo docker run hello-world  # check if pulling and running works
Executing the Docker Command Without sudo (required for docker-compose)
sudo usermod -aG docker ${USER}
su - ${USER}
groups  # check if docker is listed
sudo usermod -aG docker ${USER}
docker run hello-world # check if it works without sudo
Install Docker-compose
mkdir -p ~/.docker/cli-plugins/
curl -SL https://github.com/docker/compose/releases/download/v2.3.3/docker-compose-linux-x86_64 -o ~/.docker/cli-plugins/docker-compose
chmod +x ~/.docker/cli-plugins/docker-compose
docker compose version  # check the version
Install NVIDIA Docker
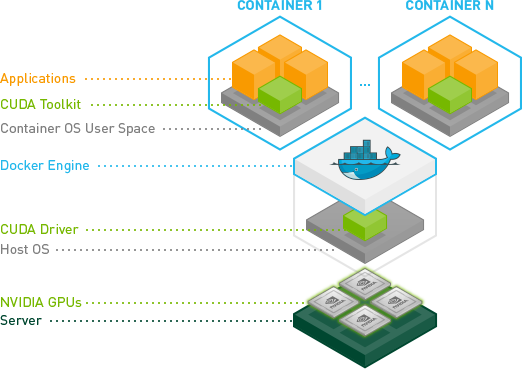
In the default installation, Docker is not able to forward tasks to the GPU. To do so, NVIDIA-Docker has to be installed:
sudo apt-get update
sudo systemctl restart docker
curl -s -L https://nvidia.github.io/nvidia-docker/gpgkey |   sudo apt-key add -
distribution=$(. /etc/os-release;echo $ID$VERSION_ID)
curl -s -L https://nvidia.github.io/nvidia-docker/$distribution/nvidia-docker.list |   sudo tee /etc/apt/sources.list.d/nvidia-docker.list
sudo apt-get update
sudo apt-get install -y nvidia-docker2
sudo reboot
Now, Docker should be able to access the GPU. In order to validate this step, the appropriate version of the Docker Image nvidia/cuda is pulled and the CUDA driver is tested:
docker run --gpus all nvidia/cuda:11.6.2-cudnn8-runtime-ubuntu20.04 nvidia-smi
In some cases it makes sense to define a docker runtime. Just set the parameter "runtime=nvidia" in the config file /etc/docker/daemon.json, which might was not initially created yet.
{
    "default-runtime": "nvidia",
    "runtimes": {
        "nvidia": {
            "path": "/usr/bin/nvidia-container-runtime",
            "runtimeArgs": []
        }
    }
}
Then test the static config: (the commands should yield the same result but without the docker parameter)
sudo systemctl daemon-reload && sudo systemctl restart docker
docker run --gpus all nvidia/cuda:11.6.2-cudnn8-runtime-ubuntu20.04 nvidia-smi
If you have troubles here or are interested in more details, check out the official nvidia-cuda project site.
Deployment of GPU-Jupyter via Docker
Now, we are ready to pull and run GPU Jupyter locally (checkout available tags on Dockerhub):
cd your-working-directory
ll data  # this path will be mounted by default
docker run --gpus all -d -it -p 8848:8888 -v $(pwd)/data:/home/jovyan/work -e GRANT_SUDO=yes -e JUPYTER_ENABLE_LAB=yes --user root cschranz/gpu-jupyter:v1.5_cuda-11.6_ubuntu-20.04_python-only
One can also build a customized version of the image. Therefore clone the repository and adapt the Dockerfile-sources in /src/, like /src/Dockerfile.usefulpackages. Then generate the resulting Dockerfile, build and run it using:
git clone https://github.com/iot-salzburg/gpu-jupyter.git
cd gpu-jupyter
git branch  # Check for extisting branches
git checkout v1.5_cuda-11.6_ubuntu-20.04  # select or create a new version
# generate the Dockerfile with python and without Julia and R (see options: --help)
./generate-Dockerfile.sh --python-only
docker build -t gpu-jupyter .build/  # will take a while
docker run --gpus all -d -it -p 8848:8888 -v $(pwd)/data:/home/jovyan/work -e GRANT_SUDO=yes -e JUPYTER_ENABLE_LAB=yes -e NB_UID="$(id -u)" -e NB_GID="$(id -g)" --user root --restart always --name gpu-jupyter_1 gpu-jupyter
Building a local image will take some time and requires a high data volume. So make sure you aren’t in the hotspot of a mobile phone. Take a break instead, walk in the fresh air, or fetch a coffee and chat with your colleagues and friends. :)
The command
./generate-Dockerfile.shwill generate a new Dockerfile in the directory.buildthat stacks the NIVIDIA-cuda image with the robust docker-stacks and an installation of PyTorch and other packages, libraries and frameworks that are important for statistics and machine learning. For more information, visit the GPU-Jupyter-Repo. There are optional parameters-sin order to make a slim Dockerfile that doesn’t install Julia, R and packages insrc/Dockerfile.usefulpackages.
After some time, GPU Jupyter will be available on localhost:8848 in the Web browser. In case you are new to the Jupyter project, click here for a nice summary. The default password is gpu-jupyter and should be updated as described in the last section. If the image is pulled, you have to specify for the first time the jupyter-token that you get from docker exec -it [container-name/ID] jupyter server list).
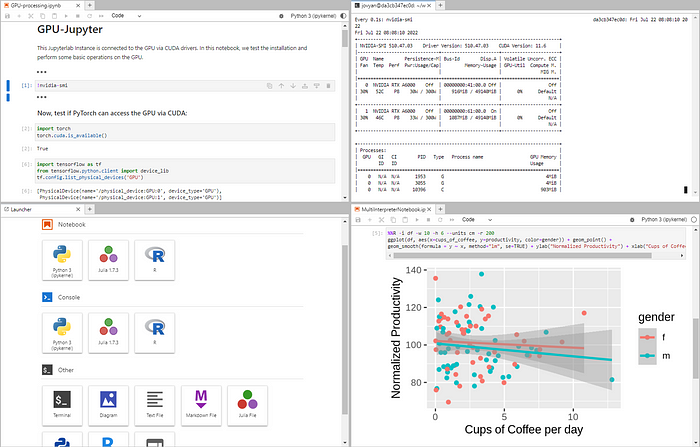
This current installation of Jupyter you have now differs in one important point from many other installations. You have full access to your NVIDIA GPU and can accelerate your ML calculations!
With these commands we can see if everything worked well:
docker ps
docker logs -f [CONTAINER_ID]
In order to stop the local deployment, run:
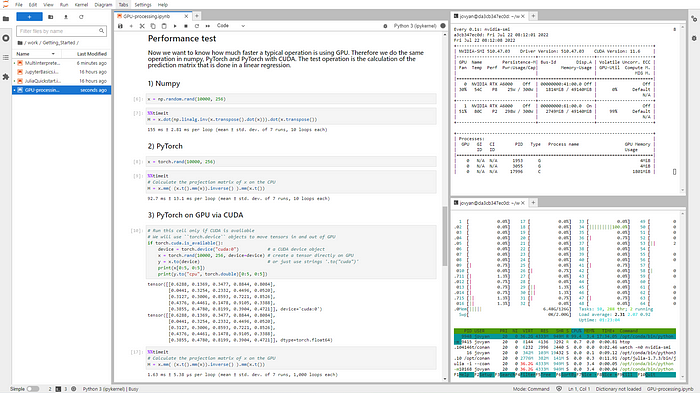
docker rm -f [CONTAINER_ID]In the demonstration code, you can measure the performance improvement in this installation. This shows a performance improvement of factor 50. Also, check if the GPU usage rises up close to 100%.
I would like to thank Peter Parente who is the main contributor and maintainer of the docker-stacks, which provide a great Data-Science toolstack that is used here on top of the basic nividia/cuda image.
(Optional) Deployment in a Docker Swarm
(Optional) Install and join a Docker Swarm
Docker Swarm is a great Docker-based tool, that helps to orchestrate multiple Docker Containers within a Cluster. For the scenario, we are using GPU-Jupyter for, we have Elasticsearch instances distributed within Docker containers across a Docker Swarm cluster, and GPU Jupyter accesses Elasticsearch from the same Docker Swarm network.
We assume, that there is an existing Docker Swarm which we want to join with our future GPU Jupyter node. Therefore, start with the firewall configuration:
sudo ufw allow 2376/tcp && sudo ufw allow 7946/udp && sudo ufw allow 7946/tcp && sudo ufw allow 80/tcp && sudo ufw allow 2377/tcp && sudo ufw allow 4789/udp
udo ufw reload && sudo ufw enable
sudo ufw reload && sudo ufw enable
sudo systemctl restart docker
In the next step, it should be verified that the nodes of the Docker Swarm can be accessed from the GPU Jupyter node. Additionally, on a current manager node of the Docker node, the join-token should be displayed. The join token can be either generated for a new manager or worker, depending on the role the GPU Jupyter should play in the Docker Swarm. It is advisable, to have a cluster with three or more managers, such that is robust even if one of the managers is down!
ssh user@docker-swarm-nodes
docker swarm join-token manager  # for a token for a new manager node
docker swarm join-token worker  # for a token for a new worker node
Finally, the node for GPU Jupyter can join the swarm, using:
docker swarm join --token [JOIN_TOKEN] [IP-of-manager-node]:2377Now, the node should be listed in the Docker Swarm if running:
docker node ls
(Optional) Deploy GPU Jupyter in a Docker Swarm
GPU Jupyter can also be added to an existing docker network. This allows GPU Jupyter to access all RestAPIs of the network, e.g., a database. To do so, you need to set following parameters:
1. Docker Swarm network name: if you want to add GPU Jupyter to an existing Docker network of a Swarm, you have to name the Docker Swarm network as a parameter. To find the name of existing networks, run:
sudo docker network ls
# ...
# [UID]        elk_datastack                   overlay             swarm
# ...
2. GPU Jupyter Port: This will be the port on which GPU Jupyter is available.
3. The Docker Registry API: The docker registry is a service that helps to distribute the Docker Image across a Swarm. The Registry is set on port 5001 and can be changed in the docker-compose-swarm.yml in the line “ image: 127.0.0.1:5001/gpu-jupyter”.
Finally, GPU Jupyter can be deployed in the Docker Swarm with the shared network, using:
./generate_Dockerfile.sh
./add-to-swarm.sh -p [port] -n [docker-network]
Now, GPU Jupyter starts and is able to access even Rest APIs of the services in the Docker Network, that are not explicitly exposed in their own docker-compose.yml. This is great for analyzing data directly within the same cluster, if security is of higher concern!
GPU Jupyter is again accessible on localhost:port with the default password asdf .
To check if the process is stable:
sudo docker service ps gpu_gpu-jupyter
docker service ps gpu_gpu-jupyter
In order to remove the service from the swarm, use:
./remove-from-swarm.shConfiguration
Change the password
There are two ways to set a password for GPU-Jupyter:
1. Use the — password or -pw option in the generate-Dockerfile.sh script to specify your desired password, like so:
bash generate-Dockerfile.sh - password [your_password]This will update the salted hashed token in the `src/jupyter_notebook_config.json` file. Note that the specified password may be visible in your account’s bash history.
2. Manually update the token in the `src/jupyter_notebook_config.json` file. Therefore, hash your password in the form (password)(salt) using a sha1 hash generator, e.g., the sha1 generator of sha1-online.com. The input with the default password `gpu-jupyter` is concatenated by an arbitrary salt `3b4b6378355` to `gpu-jupyter3b4b6378355` and is hashed to `642693b20f0a33bcad27b94293d0ed7db3408322`.
Never give away your own unhashed password!
Then update the config file as shown below, generate the Dockerfile, and restart GPU-Jupyter.
{
  "NotebookApp": {
    "password": "sha1:3b4b6378355:642693b20f0a33bcad27b94293d0ed7db3408322"
  }
}
The whole GPU-Jupyter Series:
- Set up Your own GPU-based Jupyter easily using Docker.
- Learn how to connect VS Code to your remote GPU-Jupyter instance to incorporate the advantages of an IDE and the GPU-Jupyter.
- 🧪 Reproducible Deep Learning Experiments with One Command: GPU-Jupyter | by Christoph Schranz | Medium
Enjoy running your own code on the GPU :)
For a tailored solution that supports your infrastructure’s needs (e.g. self-signed CA certificates, firewalls, active directory, file shares), please refer to b-data, which builds upon its own CUDA-enabled JupyterLab docker stacks and offers commercial support.
